
You’ve just settled onto the couch after a long day, but instead of the familiar click and hum of your cooling system, there’s only silence. As the indoor temperature begins to climb, so does your anxiety about potential repair costs and complex technical failures. It’s a stressful situation that no homeowner wants to face during a heatwave. However, before you assume your compressor has failed, performing a systematic AC not turning on troubleshooting routine can often uncover a simple fix. We know you want to restore comfort quickly without paying for an unnecessary service visit.
This article provides a methodical checklist to help you identify why your air conditioner won’t start. We’ll walk through how to safely check your power supply, verify your thermostat settings, and inspect common components like air filters. You’ll learn which tasks you can handle on your own and exactly when it’s time to call in a professional for a more technical repair. By the end of this guide, you’ll have a clear path toward cooling your home again with the confidence that every step is being handled with care.
Key Takeaways
- Establish a safety-first protocol by verifying power switches at both the indoor air handler and the outdoor condenser unit before inspecting components.
- Confirm your thermostat is correctly calibrated and set to “Cool” to ensure the control system is actually calling for conditioned air.
- Execute effective AC not turning on troubleshooting by checking for restricted airflow and high-MERV filters that can cause coils to freeze and trigger a shutdown.
- Identify hidden safety triggers, such as a tripped condensate float switch caused by a clogged drain line or insufficient clearance around the exterior unit.
- Recognize critical mechanical warning signs like buzzing sounds or refrigerant hissing that indicate a professional repair is required.
Immediate Power Checks and Safety Precautions
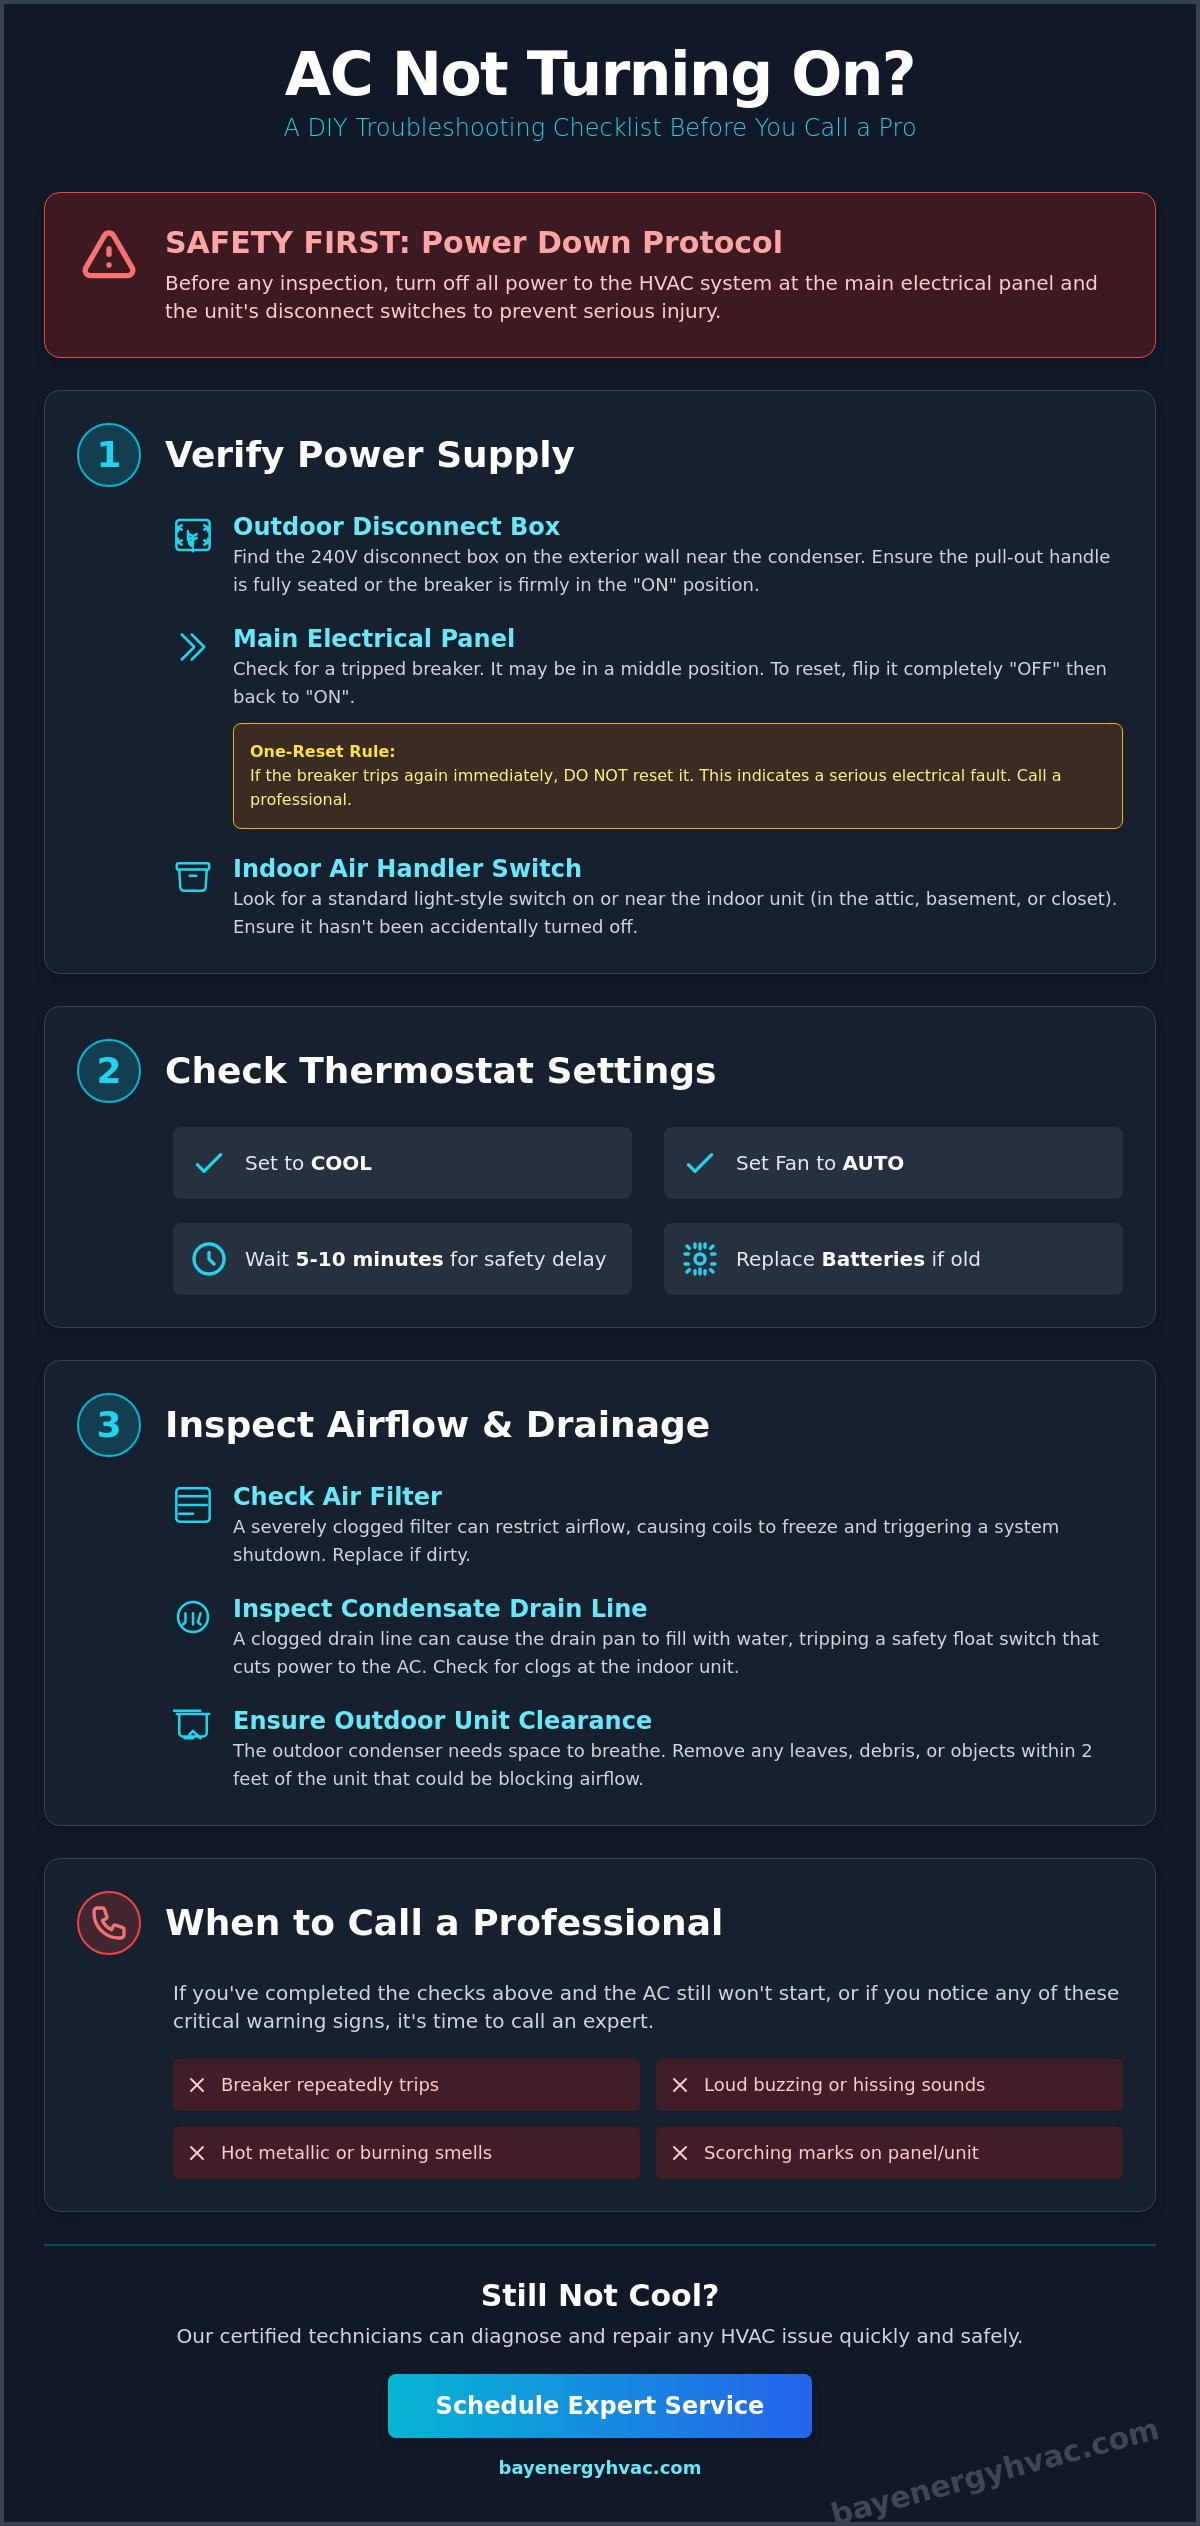
Before you investigate complex mechanical failures, you must verify that your system is actually receiving power. Most AC not turning on troubleshooting starts at the electrical panel or the service disconnects. It’s common for a system to appear dead simply because a switch was bumped or a breaker tripped during a heavy summer load. You don’t want to pay for a service call only to have a technician flip a switch you could have reached yourself.
Safety is our primary concern. Always establish a power-down protocol before you attempt to inspect any internal components or wiring. This means turning off the power at the source to prevent accidental shocks. Modern HVAC systems rely on high-voltage circuits, and handling them without proper precautions is hazardous. If you plan to look inside any access panels, ensure the power is completely severed first.
Start by checking the 240V disconnect box located near your outdoor condenser. This is a small, weather-resistant box mounted on the exterior wall of your home. Inside, you’ll find either a pull-out handle or a large circuit breaker. Ensure it’s firmly in the “on” position or that the pull-out is fully seated. If this disconnect is off, your outdoor unit won’t start, even if the indoor fan is running. It’s a simple check that often resolves the issue after exterior home maintenance or landscaping work.
Inspecting Your Electrical Panel Safely
Your home’s main electrical panel is the next stop. Open the door and look for the specific breaker labeled for your air conditioner. A tripped breaker doesn’t always flip completely to the “off” side. Instead, it often hangs in a middle position between “on” and “off”. It might look like it’s still engaged when it’s actually disconnected.
To reset it, you must flip it all the way to “off” first, then back to “on”. We recommend a “one-reset rule”. If you flip the breaker and it immediately trips again, do not try a second time. This indicates a serious electrical fault, such as a shorted compressor or a grounded wire. You should also stay alert for any hot metallic smells or visible scorching marks near the breakers. These are signs of electrical arcing that require immediate professional intervention to prevent further damage.
The Secondary Power Switches
Many homeowners overlook the secondary switches that control the indoor portion of the system. If you have a furnace or a traditional air handler, there is usually a toggle switch located on or near the unit in the attic, closet, or basement. This switch looks exactly like a standard light switch. It’s easy for someone to flip it off by mistake while reaching for a storage box or cleaning the area.
For those using modern mini-split systems, power management is slightly different. These units often have a dedicated power button on the indoor head unit or a specific circuit on the outdoor disconnect that powers both components. Ensure the indoor unit is receiving a signal from the remote and that the outdoor compressor’s disconnect hasn’t been disengaged. Verifying these basic connection points is an essential part of AC not turning on troubleshooting and can save you significant time and frustration.
Thermostat Calibration and Control System Settings
Once you’ve confirmed the system has power, the next step in AC not turning on troubleshooting is examining the thermostat. This device acts as the command center for your entire HVAC system. If the settings are incorrect or the internal components are failing, the outdoor unit will never receive the signal to start. It’s a common point of frustration, but many of these issues are resolved with simple adjustments rather than expensive parts.
First, verify that the thermostat is set to “Cool” rather than “Heat” or “Off”. While this seems obvious, seasonal transitions often lead to simple oversight. Additionally, ensure the fan is set to “Auto” so the blower only runs when the cooling cycle is active. If you’ve recently experienced a power flicker, your system might be in a built-in 5-minute delay mode. This safety feature protects the compressor from high-pressure restarts. Wait a few minutes before assuming there is a mechanical failure. Also, remember that setting your thermostat to 50 degrees will not make the house cool down faster. It only tells the system to run longer, not harder.
Batteries are another frequent culprit. Even if the display screen is visible, the batteries may lack the voltage required to trigger the physical relay that starts the AC. If your thermostat is more than a year old, replace the batteries with fresh alkalines. According to the U.S. Department of Energy, control failures are among the most Common Air Conditioner Problems found in residential units. If your screen remains blank after a battery swap, you may need professional HVAC repairs and troubleshooting services to inspect the internal control board for a blown fuse.
Common User Errors and Ghost Settings
Check your thermostat for “Hold” or “Schedule” overrides. Sometimes a programmed energy-saving mode can prevent the AC from turning on when you expect it to. To test the system, lower the target temperature at least 5 degrees below the current room temperature. This creates a clear “call for cool” that should trigger the outdoor condenser within a few minutes. Ensure there are no active “Vacation” modes that might be keeping the system dormant while you are home.
Wiring and Connection Issues
If the settings are correct but the system is still silent, you can safely remove the thermostat faceplate to inspect the wiring. Look for loose or corroded wires, specifically the “Y” (cooling) and “G” (fan) terminals. Modern smart thermostats often require a “C-wire” or common wire for constant power. Without this, some smart models will drain their internal batteries and fail to trigger the cooling relay. If you see frayed wires or evidence of small pests chewing on the connections, it’s time to seek expert assistance to restore the communication link between your thermostat and the air handler.
Optimizing Airflow and Inspecting Filtration Systems
Airflow is the lifeblood of any cooling system. When air cannot move freely through your equipment, the heat exchange process fails, often leading to a total system shutdown. This is a critical stage of AC not turning on troubleshooting because many homeowners don’t realize that a dirty filter can physically prevent the outdoor unit from starting. Modern systems are equipped with safety sensors that detect pressure imbalances or temperature drops, triggering a “kill switch” to protect the compressor from permanent damage.
One of the most common results of restricted airflow is the “Frozen Coil” phenomenon. If the air moving over your indoor evaporator coil is insufficient, the refrigerant inside the coil stays too cold. The moisture in the air then freezes onto the coil, creating a block of ice that eventually chokes the system entirely. Once this ice forms, the unit will often stop running and refuse to restart until the ice has completely melted and the sensors reset. We recommend checking your registers and vents during this process. Ensure at least 80% of your home’s vents are wide open to maintain the necessary static pressure within the ductwork.
While high-MERV filters are excellent for capturing small particles, they can sometimes be too restrictive for specific HVAC models. If your blower motor isn’t designed to push air through a dense, high-efficiency filter, it will struggle and eventually overheat. Always verify the manufacturer’s recommended MERV rating for your specific unit to avoid accidentally “choking” your system with a filter that is too thick for your blower’s capacity.
Step-by-Step Air Filter Replacement
Locate your filter slot, which is typically found in the return air duct or the air handler cabinet. Before sliding in a new filter, identify the airflow direction arrows printed on the frame. These arrows must point toward the HVAC unit, not away from it. In our region, we often recommend pleated filters over basic fiberglass models to better manage Bay Area air quality. Pleated filters provide more surface area to trap dust and pollen without immediately restricting airflow.
Clearing Obstructions in the Ductwork
Walk through your home and check for blocked return air grilles. Furniture, heavy curtains, or rugs placed over floor vents can starve the system of air. Listen for unusual whistling or banging sounds when you try to start the unit, as these often indicate pressure imbalances within the ducts. If your home has aging, inefficient ductwork that consistently causes airflow issues, you might consider a mini split system installation Bay Area residents frequently use to bypass these structural bottlenecks. For those already using mini-splits, remember to lift the front panel of the indoor unit and wash the mesh filters every few weeks to ensure the unit can breathe properly.
Exterior Unit Inspection and Condensate Management
Moving outside is the next logical phase of your AC not turning on troubleshooting. The outdoor condenser unit is responsible for releasing the heat collected from inside your home. If this heat cannot escape, the system will overheat and shut down to protect its internal components. You should maintain at least a two-foot “clearance zone” around the unit. Overgrown shrubs, tall grass, or stacked firewood can restrict airflow and force the compressor to cycle off prematurely before your home reaches the target temperature.
For residents in Marin and Solano counties, salt air corrosion is a specific environmental concern. The coastal microclimate accelerates the degradation of aluminum fins and copper coils. Over time, salt buildup creates a crust that insulates the coils, preventing efficient heat transfer. If you live near the bay, you can safely perform a visual inspection of the “contactors” and “capacitors” through the side grilles. Look for signs of bulging or “pitting” on the contactor points, but do not reach inside. These parts can hold a lethal electrical charge even when the power is disconnected at the breaker.
Clearing the Condenser Fins
Your condenser fins are delicate aluminum slats that facilitate heat exchange. Over time, they collect leaves, dirt, and cottonwood fluff that act as an insulating blanket. When cleaning these, never use a high-pressure power washer. The intense pressure will flatten the soft fins, permanently restricting airflow. Use a soft brush or a low-pressure garden hose to gently clear the debris. If you notice extensive sections of bent fins, the system will struggle to breathe and may eventually refuse to start due to high-pressure safety resets.
Troubleshooting the Drain Line
A frequent cause of a system refusing to start is a tripped condensate float switch. As your AC removes humidity, the water drains through a PVC pipe. If this pipe clogs with algae or biological growth, water backs up into the emergency pan. The float switch then triggers a safety “kill switch” to prevent water from leaking through your ceiling. Locate your drain exit and check for standing water in the indoor overflow pan. You can often clear a minor clog by using a wet/dry vac at the exterior drain exit to pull the obstruction through. If the water remains stagnant, you likely need professional AC system services to blow out the line and reset the safety sensors.
Recognizing When Professional HVAC Repair is Required
If your system remains unresponsive after completing the initial AC not turning on troubleshooting steps, the issue likely involves internal electrical or mechanical components. These parts require specialized diagnostic tools, such as multimeters and manifold gauges, to assess safely. Attempting to repair high-voltage capacitors or pressurized refrigerant lines without training can lead to severe injury or further equipment damage. We believe in empowering homeowners to handle simple maintenance, but technical failures require the precision of a seasoned expert.
A persistent buzzing or humming sound coming from the outdoor unit often indicates a failed start capacitor. This component provides the initial electrical surge needed to kickstart the compressor motor. When it fails, the motor may try to turn but lack the power, resulting in that distinct noise. Furthermore, keep an eye out for oily residue on the copper lines or a faint hissing sound. These are clear indicators of a refrigerant leak. With the production of virgin R-410A capped at 60 percent of baseline levels for 2026, managing these leaks has become more critical and costly. Identifying the problem early prevents the compressor, which is the heart of the system, from running dry and suffering a total failure.
Symptoms of Mechanical Component Failure
You may encounter a situation where the outdoor fan is spinning, but the air coming from your vents isn’t cold. This often points to a compressor that has failed to engage or a significant loss of refrigerant. Another common red flag is frequent short cycling, where the AC turns on and off every few minutes without completing a full cooling cycle. This puts immense strain on the motor and electrical connections. If you ever detect a burning smell or see electrical smoke, perform an immediate emergency shutdown at the breaker and contact a professional. These symptoms indicate arcing or overheating wires that pose a fire risk.
The Bay Energy Advantage in Contra Costa and Alameda
Our team provides dedicated expert service across Solano, Marin, Contra Costa, and Alameda counties. We understand the unique challenges posed by Bay Area microclimates, from the heavy fog of the coast to the intense heat of the inland valleys. We prioritize thorough diagnostics over aggressive sales tactics. Our goal is always to restore your current system through honest AC not turning on troubleshooting and repair unless a replacement is truly the more cost-effective long-term solution for your home. We’re here to act as your patient guide through the complexities of modern HVAC regulations and technology.
Schedule a professional AC diagnostic with Bay Energy today to ensure your home stays comfortable all season long.
Restoring Your Home’s Comfort and Reliability
Effective cooling starts with a methodical approach to identifying simple power or airflow issues. By verifying your thermostat settings and inspecting for drainage clogs, you can often resolve minor interruptions without a service fee. However, when the problem shifts to complex electrical relays or refrigerant concerns, prioritizing safety is the most professional choice you can make for your home infrastructure. You’ve now gained the knowledge to distinguish between a simple reset and a mechanical failure.
If your systematic AC not turning on troubleshooting has reached its limit, our team is ready to provide the technical expertise you need. We are specialists in mini-split and heat pump repairs, serving homeowners across Contra Costa, Alameda, Solano, and Marin Counties. Our technicians offer 24/7 professional reassurance to ensure you never have to navigate a cooling failure alone. We focus on precise diagnostics to get your system running efficiently while protecting your long-term investment and peace of mind.
Book Your AC Troubleshooting Service in the Bay Area Today and let us handle the technical details. We’re here to ensure your home stays cool and comfortable regardless of the temperature outside.
Frequently Asked Questions
Why is my AC thermostat on but the unit is not running?
Your thermostat often operates on independent battery power or a dedicated low-voltage wire, which allows the display to remain lit even if the rest of the system has lost power. This usually happens when a circuit breaker has tripped or the outdoor disconnect switch has been turned off. It can also indicate that a safety device, such as a condensate float switch, has cut power to the condenser to prevent water damage.
Can a dirty air filter really stop an AC from turning on?
Yes, a severely clogged filter can trigger a total system shutdown by causing the evaporator coil to freeze or the blower motor to overheat. When airflow is restricted, the internal temperature drops too low, turning moisture into ice that chokes the system. Regular filter changes are a vital part of AC not turning on troubleshooting because they ensure the sensors don’t detect a fault and kill the power.
How do I reset my air conditioner after a power outage?
You should start by turning the thermostat to the “Off” position and then flipping the AC circuit breaker to “Off” before switching it back to “On”. Wait at least 30 minutes before returning the thermostat to the “Cool” setting. This delay is necessary to let the internal circuitry and the compressor’s internal pressures stabilize. Many modern units have built-in timers that prevent an immediate restart to protect the motor from damage.
What does it mean if my AC outdoor unit is making a humming noise but not spinning?
A humming sound without fan movement typically indicates that the start capacitor has failed and cannot provide the electrical surge needed to start the motor. It could also mean the fan motor is seized or a contactor is stuck. Since these components involve high-voltage electricity, you should turn the power off immediately. You’ll need a professional technician to test these parts with a multimeter to ensure a safe and accurate repair.
Is there a reset button on my outdoor AC unit?
Most modern residential air conditioners do not feature a visible “reset” button; instead, they are reset through the electrical service panel. You can perform a hard reset by turning the breaker off for one full minute and then flipping it back on. If your specific model has a manual high-pressure reset switch, it’s usually a small red button located near the refrigerant lines. This switch requires a professional to investigate why it tripped initially.
How much does it typically cost for an AC troubleshooting service call in the Bay Area?
Service call fees in the Bay Area generally reflect the specialized expertise required for high-efficiency systems and the local cost of operating a professional service. These fees typically cover the technician’s travel and the initial diagnostic time spent identifying the root cause of the failure. Most reputable providers will provide a clear estimate for any necessary repairs after this initial assessment is complete. Prices can vary based on the complexity of the system.
Can I still run my AC if the filter is slightly dirty?
You can technically run the unit with a slightly dirty filter, but it will reduce your efficiency and increase the strain on the blower motor. As debris accumulates, the risk of a frozen coil or a sudden system shutdown grows. We recommend checking your filter every 30 days during the summer to maintain optimal airflow and prevent the need for intensive AC not turning on troubleshooting later in the season.
What happens if my condensate drain line is clogged?
A clogged drain line causes water to back up into the emergency overflow pan, which triggers the float switch to shut down the entire system. This safety mechanism is designed to prevent gallons of water from leaking through your ceiling or damaging your home’s structure. The system will refuse to restart until the water is drained and the clog is cleared. This is one of the most common reasons a cooling system suddenly stops working.